Showing posts with label Tutorials. Show all posts

Tuesday, January 3, 2012

Christmas Quilt

Earlier this December I completed a Christmas quilt for Claire.  It is a small crib size/toddler quilt.  I took pictures of my process and I wanted to share it with you.  This small quilt can be completed with any theme in mind, just by a jelly roll that you love.


I used one Moda Jelly roll in Jovial, 2 yards for the back, and batting.

Instructions:

1. The first thing I did was group by color ways: red, blue, green, white, and black.

2. Next, I took out four strips I wanted to use as binding and set them aside for later.

3. Now to cut.  For each color way, I made six blocks.  So I need 24, 8.5 inch strips of each color.

4.  Designing the blocks.  I randomly took four strips from each color way and grouped them together.  I made sure I didn't have repeats of the fabric in a block.

5. Sewing, finally!.  I took two of the strips and sewed them together.  To save thread, I chain stitched the blocks.

6.  Press the seams open.


 7. Stack up two of your half blocks and sew them together.  I chain stitched these as well to save time and thread.


 8.  Press open your blocks and now you should have six blocks in each color way for a total of 30 blocks.


Here is where I stopped taking pictures, however I will do my best to explain how I finished up the quilt.

9.  Square up your blocks.  Each block should be roughly, 7.5 inches.

10. Layout your quilt. While laying out the blocks, rotate each block to look like the picture below.


11.  Piece together the top.  I sewed the blocks into rows, then sewed the rows together.

12.  Now for the quilt sandwich.  I laid down the backing (face down), then the quilt batting, then the top.

13.  Quilt your top.  I hand tied this quilt in the corners, where the blocks meet.

14.  Bind your quilt using your leftover jelly roll strips.  I love the Distant Pickles binding tutorial and pull it up every time I need to bind a quilt.

Enjoy your finished quilt!


Sunday, January 30, 2011

Ladybug Backpack


I love the Sew, Mama, Sew! Blog. I have found many great tutorials on the site and I wanted to post my own version of the drawstring backpack.

Here is the link to the tutorial.  I love it because it is super easy and is so customizable. Backpack Tutorial

I followed the instructions as they were, the only thing i changed was the flap.  The top flap was supposed to be a 7 inch square.  I used a Fiesta cereal/soup bowl to make a 7 inch circle.  I appliqued the eyes and the mouth onto the circle before construction.  For the whites of the eyes, I traced a larger thread spool and for the black I traced a small thread spool.


 For the inside, I created two pockets.  One was a small ID pocket and an elastic pocket for sippy cups.


I hope you all enjoy and take time to adjust tutorials to express your creativity. 

Monday, January 24, 2011

Ruffled Skirt Tutorial

Claire's Ruffled Skirt

At first glance this looks difficult, but it is not.  It is just time intensive, with a lot of different steps.  I sized it to fit a 2T/3T.  I made Claire's a little large so that she can wear it for awhile.


Supplies:

1/2 yard of pink dot fabric (fabric A)
2/3 yard of paisley print fabric (fabric B)
3/4 inch elastic 19-20 inches (depends on the size of your child's waist)
Coordinating thread
Safety Pins
Iron
Sewing Machine

Cutting:

Fold your fabric in half.  All measurements are from the fold of the fabric.

Fabric A (pink dot)
Waist (cut 2): The piece is 5" in height. The top measurement is 6.75" and the bottom measurement is 7.25".
 Fold is on the left.

Top Stay (cut 2): The piece is 3.25" in height. The top measurement is 6.75" and the bottom measurement is 7.25".

Middle Ruffle (cut 2):  The piece is 5" in height and 13.5" in length.
All Fabric A Cuts
All pink dot cuts (fold in on the left)

Fabric B (paisley)

Top ruffle (cut 2): The piece is 4.25" in height and 12.5" in length.

Bottom ruffle (cut 2): The piece is 5.25" in height and 14.5" in length.

Bottom Stay (cut 2):  The piece is 4.25" in height. The top measurement is 7" and the bottom 
measurement is 7.5".
 All Fabric B Cuts
 The fold is on the right side.

Construction. All seams are sewn with a 5/8 inch

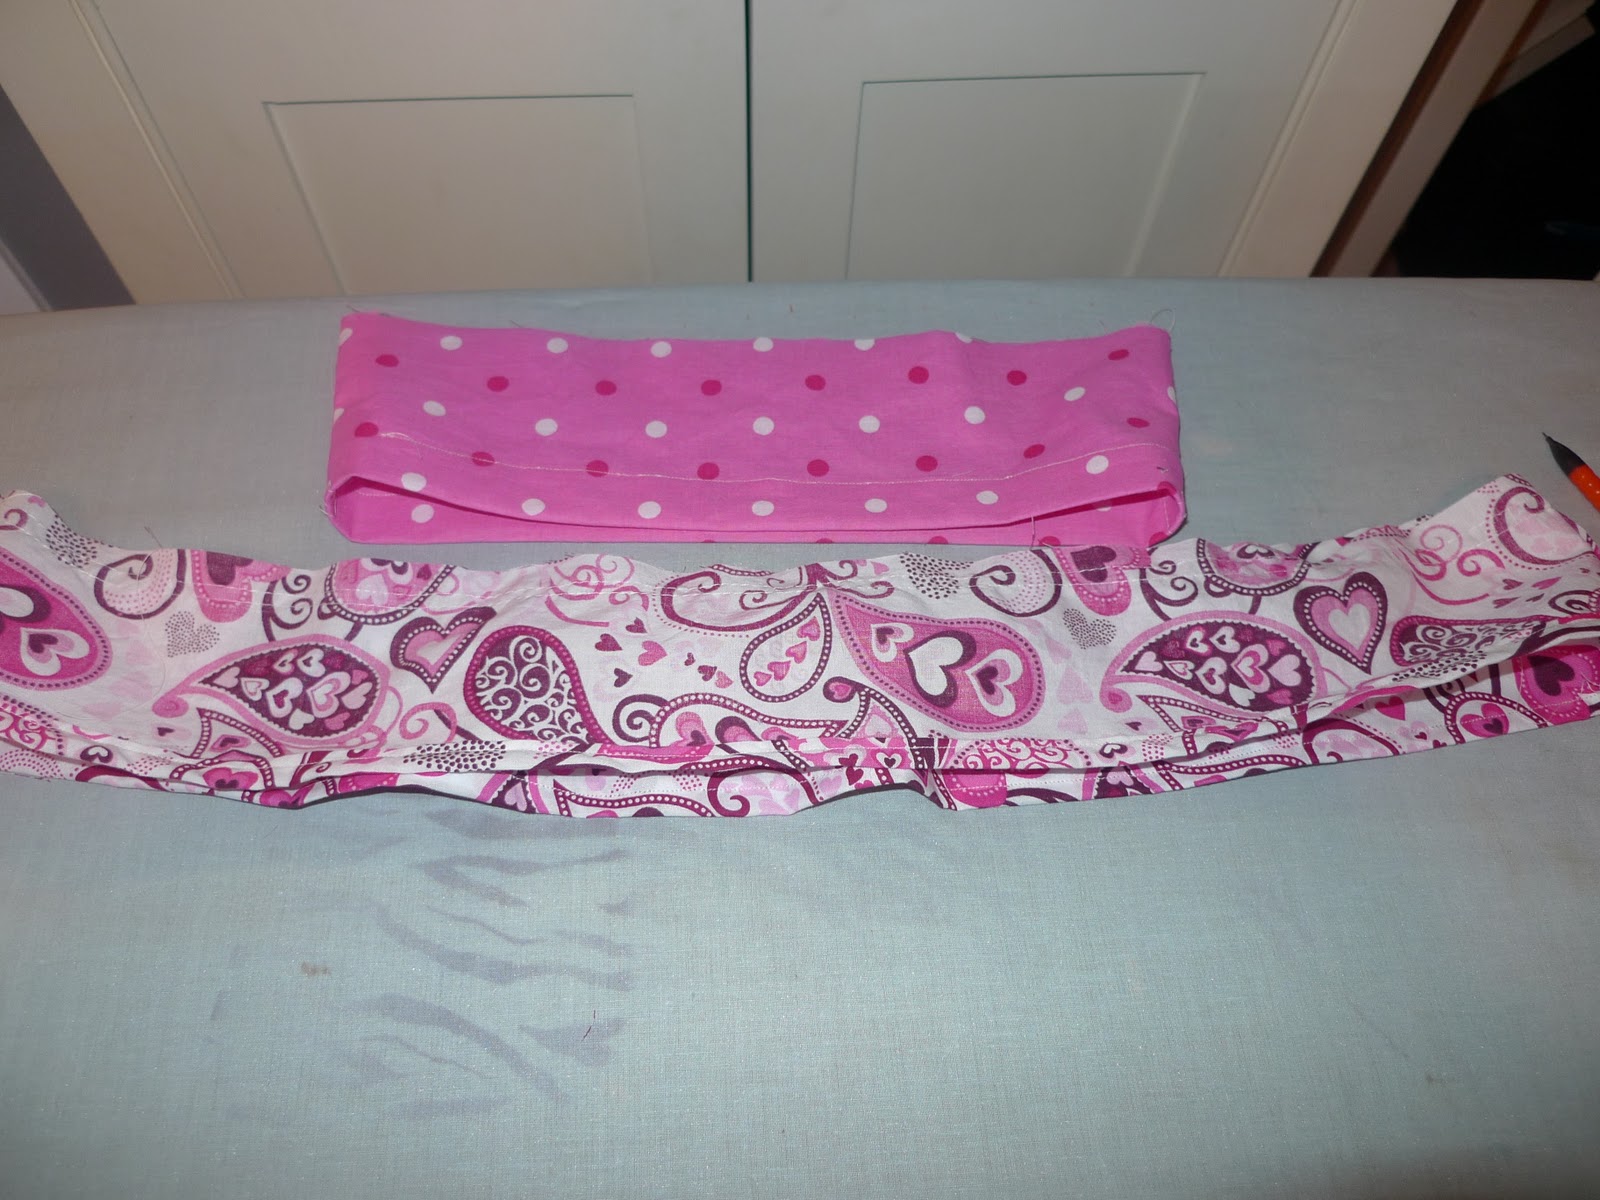
1.  For each pair of cuts, put right sides together and sew the short seam.  You are creating large loops of fabric.

2. Press open all of the seams
3.  For each ruffle, fold up 0.25" and press.
4. Repeat and fold up another 0.25" and press. Then sew, creating a clean hem. Repeat for all 3 ruffle pieces.
5. On the opposite edge of the ruffle use a basting stitch and sew 0.5 inches from the edge.  DO NOT backstitch.  You are creating a gathering stitch for the ruffles.  Repeat the gathering stitch 0.25 away from the first row. tip: Keep the tails long so you have something to pull.  Repeat on all 3 ruffle pieces.


6. Middle Ruffle instructions.
      a.  Line up Top Stay (narrow edge down, right side of fabric up) to the Middle Ruffle (hemmed      edge down, wrong side fabric out).

      b. Pin right side together, lining up the seams. Repeat with the left side.

      c.  Start pulling the loose gathering strings until the ruffle is the same width as the stay.  Be sure to distribute the ruffling evenly.
 
 
     d.  Sew the ruffle to the stay along the pin line.  I lined up on the bottom basting stitch.
     e. Flip right side out and press the seam upward.
7.  Repeat steps 6a through 6e with the Bottom Ruffle and Bottom Stay

 8.  Putting the middle ruffle and bottom ruffle together.
      a.  Turn both side inside out, like the photo.
     b. Pin the middle ruffle and stay to the bottom stay, leaving the bottom ruffle free. Sew the layers together.

    c.  Turn inside out and press seams upward.

9.  The Waist.
  a.  Turn inside out and press the seams open.  Then baste the seams about 1.5" down on the top (narrow) side.
b. Press in 0.25" from the top (narrow edge). Then fold down another inch and press.

    c.  Sew along the bottom edge of the pressed seam and leave 1.5" open to insert the elastic later.
    d.   Attach the top ruffle to the bottom edge of the waist piece (using steps 6a-6e).

 10. Putting it all together.
   a.  Flip the waist piece inside out.  (The top picture is flipped wrong, it is correct in the picture below.)
   b. Pin the top of the middle stay to the ruffled edge.  The layers should be the top of the Middle Stay, the top of the Top Ruffle, and the bottom of the waist piece.  Sew 5/8 inch in. 
   c. Press seams upward.  Flip right side out.

11. Measure the elastic around your child's waist (or a pair of pants), add an inch and cut.  Thread the elastic through the waist band.  Safety pin one side of the elastic to the dress.  Then pin the other safety pin to the end of the elastic.  Thread the elastic through the waist band.  Sew the elastic together.  Making a square and then an X in the middle.  Sew the opening closed, making sure the seam is pulled straight.

There you have it.  It really isn't that hard, it just takes time and patience.


Saturday, October 3, 2009

Birthday Card for Dad

My dad's birthday is coming up in a couple of weeks and I decided to make him a card this year. I made him the following card and envelope.


Paper:


  • 12x12 striped paper for envelope
  • 12x12 argyle print paper for card
  • 12x12 cardstock in beige for card
  • printed paper for fish (I began with a yellow and switched to a print)
  • dark blue paper for lettering
  • dark brown paper for frame and accents
  • green paper for accents
*The printed paper I used was from Die Cuts With a View "Stack 6" from Joann fabric and craft store.
Cricut Cartridge: Wild Card

Supplies:
  • Xyron sticker maker
  • Glue pen
  • Glue stick
  • Bone folder
  • Scoring blade in paper cutter
Part 1:  Envelope
  • Load in striped paper.

  • Select "fit to page" button.
  • Select the shift button and then the "Father" button (refer to page 66 in the booklet).  
  • Hit "Cut." This will cut an envelope for a 4 1/2 inch card.
  • Unload paper.


  • Using the scoring blade, score the folds of the envelope so that the stripes are on the inside of the card.
  • Fold and glue the envelope.


Part 2: The Card (un-select the "fit to page" button and set the size dial to 4 1/2 inches.)
  • Base of the card:
    • Load the beige cardstock.
    • Select the "blackout" feature key.
    • Select the "father" card key.
    • Hit Cut
    • Unload machine and set aside the card base.
  • Front of card:
    • Load the argyle paper.
    • Select the "father" card key.
    • Hit Cut
    • Unload the machine and set aside the front of the card.
  • Frame and accent:
    • Load the brown paper
    • Select the "frame" feature key.
    • Select the "father" card key.
    • Hit Cut.
    • When finished cutting select the "icon" button.
    • Select the "father" card key.
    • Hit cut.
    • Unload the machine and set aside the frame and grass accent.
  • Green Accent Grass
    • Load the green paper
    • Select the "icon" button.
    • Select the "father" card key.
    • Hit cut.
    • Unload the machine and set aside the grass accent.
  • Fish (I first cut the fish in gold, but I did not like the look, so I used a green printed paper instead.)
    • I selected a green printed 12x12 paper.
    • Load the paper.
    • Move the blade using the arrows surrounding the cut button to a place where I wanted the fish to be.


    • Select the "icon" button.
    • Select the "shift" key.
    • Select the "father" card key.
    • Hit cut.
    • Unload the machine and set aside the fish.
  • Lettering "Happy Birthday"
    • Load the blue paper.
    • Change dial size to 5 inches.
    • Select the "phrase" button.
    • Select the "cupcake" card key (see page 61 in the handbook).
    • Hit "Cut"
  • Lettering "Dad" or any name.
    • Change the dial size to 1 inch
    • Select the "alphabet" feature key.
    • Select the "shift" key.
    • Select the first letter "D"
    • Select the remaining letters "ad"
    • Hit "cut"
    • Unload paper and remove the lettering.
    • So I do not misplace the lettering, I immediately load them into the Xyron sticker machine and make them into stickers.
Part 3: Card Assembly


  • Score the inside of the beige and argyle cards.
  • Using the glue stick, adhere the argyle card to the beige card base.


  • Using the glue pen, adhere the brown frame to the opening of the argyle card.
  • Using the glue pen, adhere the fish to the center of the card in the opening.


  • Using the glue pen, adhere the green grass to the inside of the card.
  • Cut the brown cattail tips of the brown grass.


  • Using the glue pen, adhere the brown cattail tips to the green grass.
  • Remove the stickers (lettering) and place on the card.


Now you have fully assembled a birthday card for a fisherman.

LinkWithin

Related Posts Plugin for WordPress, Blogger...