Monday, April 30, 2012

Rainbow Goodness

Friday I received my rainbow charms from a swap at Sweet Diesel Designs.  I couldn't wait to open up my charms and go through all of the delicious fabrics. They were separated into eight even color groups; red, pink, orange, yellow, green, blue, aqua, and purple


I decided long ago that I wanted to make a granny squares quilt mixing my current scraps with the rainbow scraps.  Here are my 2.5" square piles.  I decided to add onto my eight original piles and selected black, brown, grey, and multi colored fabrics.


That is 708 squares! I had to keep track and total them out as I was cutting and sorting.


After some calculations, I decided I was going to need approximately 700-1000 colored squares depending on the size of quilt I am going for. The plan is to make a few blocks until I am tired of making them or run out of scraps, collect more scraps and sew some more.

I was making layouts and decided to make a larger granny square than I have been seeing on other blogs.  I am really pleased with my decision and if I calculated right I will need 42 blocks to make a queen size quilt.  I will post more about the dimensions and number of squares later this week.


Fat Quarter Idol FInalist!

I am a Fat Quarter Idol finalist over at Sew, Mama, Sew!

My board is #7!
If you haven't checked out Fat Quarter Idol, check it out.  There is a new contest each week where you pick out your favorite 12 fabrics from Sew, Mama, Sew that fit the theme.  This past week's theme was Meet Me at the Picnic and this week's theme is Daddy-O. Click the link for instructions on how to enter!

Thursday, April 26, 2012

My Fabric Wishlist

So many new fabrics lines are coming out now and I am so excited to get to see them. I wanted to share with you my dream wish list.

1. Vintage Modern by Bonnie & Camille for Moda.  I love the aqua, red, grey, and green combination.  I also love the dot fabrics and the houndstooth. They all perfectly compliment the the florals. This is number one on my list.

photo from Amazon
2. Chevron fabric from Riley Blake.  I love them with all of the beautiful colors. I would love to have one of each color.
photo from Poppy Seed Fabrics
3.  Welcome to Bear Country by Moda.  This line takes me right back to my childhood and all of my Berenstain Bears books.  I love it and it would make some great baby quilts.

photo from Emerald City Fabrics
I could pick more, but these are the ones I am in love with right now.  What is on your wishlist?

Monday, April 16, 2012

Menu Planner


Ever have those days where you can't figure out what you want for dinner and just can't make a decision.  That has been happening frequently in my house and has caused me to go into a cooking rut.  I hate being in a cooking rut because I love to cook and create in the kitchen.

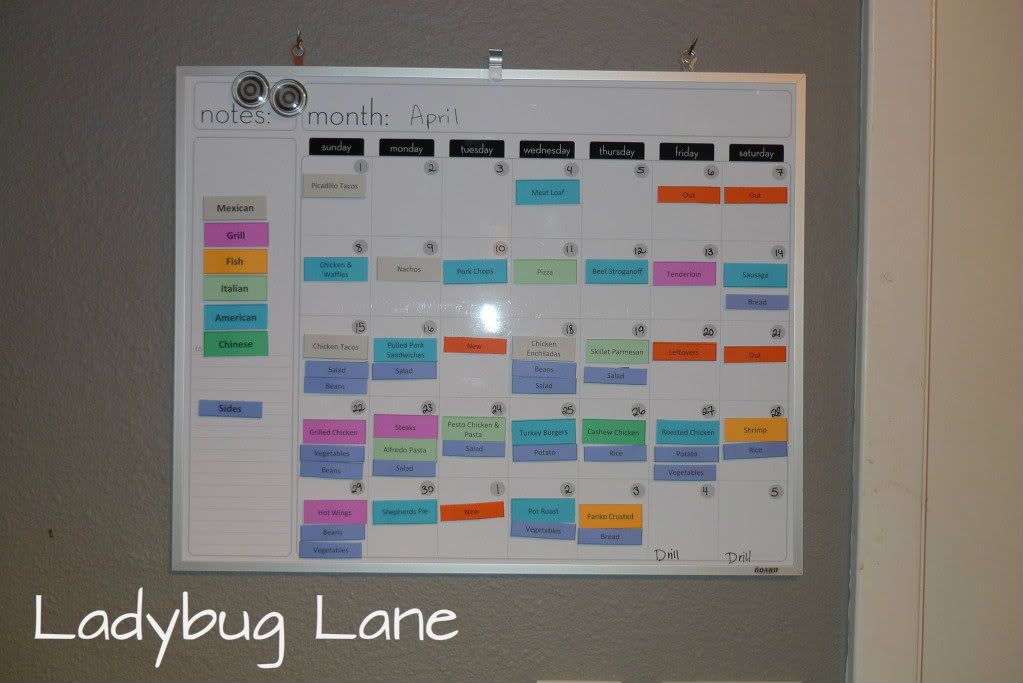
I decided to work on a menu calendar after seeing a few pinned on Pinterest. I could have just written a menu into my planner, but that seemed so permanent and not flexible.  The dry erase calendars with magnets makes menu planning easy and is flexible.  I plan to shop for 2-4 weeks at a time and therefor I can swap out meals without the fear of not having the ingredients.

My husband had started the process by starting a list of all of our favorite recipes and grouped them into several categories.  I will share my process with you.

Meal Tabs
1.  In Microsoft Word, create a table with three columns and five rows.
2.  Under the tables tab select Table Properties.  Here you can change the width of the columns and height of the rows.  The width was set to 2" and the height was set to 0.75".
3.  At this time you can set the size and font.  I chose Callibri and an 18 point font. I also centered the text in the table boxes.
4.  Enter your meals into the table.  I started out with the meal category.  I bolded and changed the size of the font to 24 for the titles.
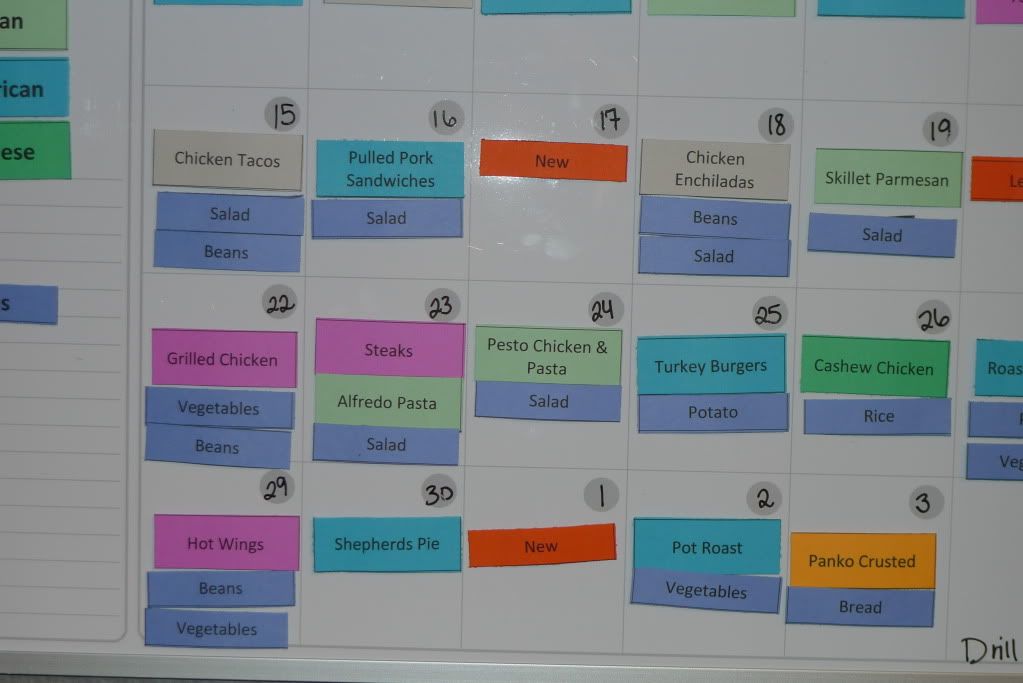
5.  I printed out each table onto a different color of card stock.
5.  Cut out the recipe tabs.
6.  I bought a roll of magnet tape from Wal-Mart that was 1 inch wide by 10 feet long.  Cut the magnet into 1" segments.  I then cut the magnet into thirds, so I had three skinny one inch long strips.
7.  Attach the magnet strips onto the back of the meal card.
8. Start organizing your menu strips onto the calendar.


I am not 100% sure with the way I set it up.  I may change the categories to main ingredient instead of type of cuisine.  I also need to add to my recipe collection.  Right now I am working on compiling a binder of recipes.  I have been printing off my recipes and copying them out of my cookbooks.  After going through a few of my cookbooks, I have found more recipes to add to my board.  It is a good thing I cut out a few more colored blocks so I can handwrite in some new dishes.

If you have any questions or have any suggestions I would love to hear about them.

Sunday, April 15, 2012

May for Me Bingo Card

I have been lacking on posting lately due to preparing taxes.  So today I decided to do something for me.  I went through all of my scraps and pulled out just enough for my May for Me Bingo card.  I am very pleased with my results.  Check out more of the cards and make your own at  Marcia's Crafty and Sewing Blog. You have until April 22nd to link up, so go ahead and make yourself a card!


B- Dog, Mickey Mouse, Swirls, Present, Anchor
I- Lemon, Fluer-de-Lis, Light, Car, Ornament
N- Dots, Penguin, Free Space, Ladybug, Fire Hydrant
G- Snail, Candy, Snow Flake, Holly, Lime
O- Stripes, Bird, Flower, Fan, Butterfly

Marcia's crafty sewing & quilting


April Finishes


Monday, April 9, 2012

One thing, One week

Last week I joined the One Thing, One Week Challenge over at Amy's Creative Side.  I wanted to finish my quilted zippered pouch that had been sitting on my design wall for a few weeks.

As you can see I finished it last week and posted it in my shop.  Now for the next week  I need to keep it up and finish up some other projects this week.


April Finishes


Wednesday, April 4, 2012

New Items for my shop

Today I finished up a scrappy pouch for my etsy shop using remanents from my Ruby fat eighths. It measures 5"x8" and is adorable.
I love the light blue scalloped back.
While finishing it up I convienently sewed right through my left index finger.  Of course I was more concerned about not getting blood on the beautiful fabric than I was about the thought of a needle in my finger.  

After I patched myself up, I worked on my iphone case design.  I am very please with my first attempt and will place it in my etsy shop.  The case is just big enough for my iphone 3Gs without the cover on it. Next round I will make it just a big bigger.  


I am linking with Such a Sew and Sew's April Finishes


April Finishes


and Freshly Pieced WiP Wednesdays

WIP Wednesday at Freshly Pieced

My entry into Wow Me Wednesday sponsored 
by Appliances Online and Bosch Washing Machines

Tuesday, April 3, 2012

April Craftsy Block of the Month

This weekend, Amy Gibson published another awesome video sharing english paper piecing.  I have been scared of hexagons, but Amy again made it so simple and look so easy.  I had a great time watching a few movies, Pride and Prejudice and Dirty Dancing, and stitching up my hexies.

Block number one:

For block number two, Amy challenged us to create new shapes and be creative.  So Claire and I were playing with shapes and came up with a butterfly.  I need to finish it up with some hand stitched antennas.


We are now up to eight blocks and they are looking so great!

LinkWithin

Related Posts Plugin for WordPress, Blogger...